

Tour Of The Course
Course Details
MEN…Par: 72, Slope 122, Length: 6,368 YDS
LADIES…Par: 74, Slope 127, Length: 5,310 YDS
YELLOW…Par: 72, Slope 121, Length: 6,106 YDS
Scroll down the page to see the full slope rating charts
Brynhill is an 18 hole golf course, set in beautiful parkland in the Vale of Glamorgan.
The current hole layout was designed by David Thomas famous for the Ryder Cup layout of the Brabazon Course at the Belfry.
The course is maintained to a high standard by Course Manager, Richard Hatcher.
The course is a strong challenge and it is said that if you can learn to play golf at Brynhill you will be able to play anywhere..
Front 9
-

Hole #1
PAR 4 • 450 YDS • S.I 5
The 1st is a tough opening hole. Those on the practice putting green will test your nerves as they stop to watch you. Your drive needs to be straight to give yourself every chance of hitting this well protected green in two. A downhill lie for your second shot is inevitable and miss the green and you will have a tough up and down to save par. Many members say that walking off with a bogey 5 is an acceptable start here. -

Hole #2
PAR 4 • 305 YDS • S.I 15
The 2nd is a risk / reward hole for long hitters. You can take a direct line over the conifer trees but beware if the breeze is against. Hit the top of the conifer trees and you may never see the ball again. Alternatively you can attempt to cut one off the tee if your right handed however most drives will end up in the left rough. Hopefully you will have a path to the green and if so a good birdie chance is on the cards. -

Hole #3
PAR 3 • 151 YDS • S.I 11
The 3rd is the first of only four par 3s on the course. Depending on the wind the club can be anything from a 5 iron to a PW. The hole looks simple enough but beware there is no nice spot to miss this green. There is a bunker short left of this green which is well positioned. Miss the green right and you could get a very nasty kick that will put you in some real trouble. Hit the green and the downhill walk will have you smiling all the way.
-

Hole #4
PAR 5 • 527 YDS • S.I 7
The 4th is the first of the four par 5s on the course. To avoid being in trouble on this dog-leg your tee shot has to be hit on the right line or be long enough to make the corner. Hitting a good drive still won’t guarantee a regulation par. Focus is required all the way up this hole to avoid a big number. Make three good swings and you may find yourself walking off with a birdie or a satisfying par. Missing the green right is a big no no here as you will have either a very difficult bunker shot or worse.
-
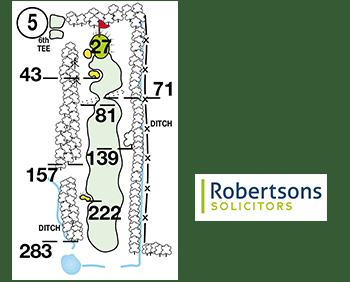
Hole #5
PAR 4 • 443 YDS • S.I 1
The 5th hole is a very picturesque and challenging par 4 with stunning views across the Vale. This is said to be one of the toughest driving holes in South Wales! The drive, from an elevated tee needs to be very straight as you can land out of bounds on the right with water hazards on the left posing an additional challenge. One of the best and toughest Par 4s you will play. Its S.I 1 for a very good reason and walking off here with a par is a very satisfying result.
-
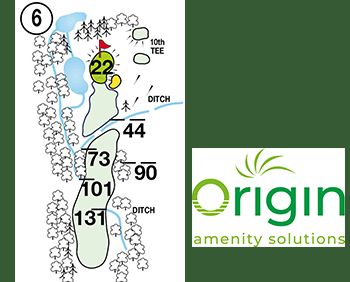
Hole #6
PAR 4 • 293 YDS • S.I 13
The 6th hole gives you a bit of a breather after the tough opening 5 holes. It’s a short par 4 and a great birdie chance. However don’t be too complacent. Your drive needs to avoid missing the fairway left and an accurate second shot is required to navigate the deep pond left and bunker right. The green slopes back to front here so trying to stay below the hole for your putt will make your birdie chance much easier.
-

HOLE #7
PAR 4 • 424 YDS • S.I 3
The 7th hole is one of those that can play tough or easy. This all depends on the wind direction and the pin placement on the large two tier green. If the pin is at the top it turns this hole into a very tough par 4. Keeping your drive up the right side of the fairway is key here and clubbing for your second shot needs to be spot on to avoid a long putt.
-

HOLE #8
PAR 4 • 301 YDS • S.I 17
The 8th is a fairly straightforward hole and keeping your drive up the left side of the fairway is a good idea as the fairway cambers off to the right. Longer hitters will be able to reach the plateau from the tee and this will allow you to see the pin for the second shot. The green is long and judging your second shot is key to making a birdie here.
-

HOLE #9
PAR 3 • 150 YDS • S.I 9
The 9th is a visually stunning hole. A short but challenging par 3 with an elevated tee and green. Quite a tricky hole which needs accuracy off the tee to hit the green. Miss the green, long, and you will have great difficulty getting your 2nd shot to stay on the green. Miss it short and you will need the flop shot skills of Phil Mickelson to save par. Making par here is another satisfying result and a good end to the front 9.
Back 9
-
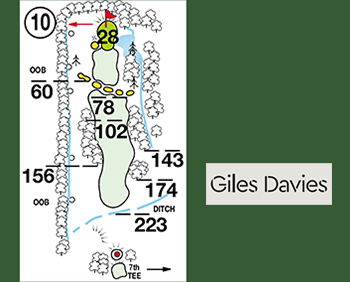
HOLE #10
PAR 4 • 366 YDS • S.I 12
Hole 10 is another tough par 4. The prevailing wind is usually off the left and sometimes you cannot feel it from the tee. At 260 yds there is a ditch with several pot bunkers which you need to avoid at all costs. Driving the ball on the fairway is only the 1st objective here. Your approach shot to this fairly small green protected by a well guarded bunker left and a water hazard right is a very nervy feeling. Hit the green and your nerves turn to elation. Walking off here with a par is a great score.
-

HOLE #11
PAR 5 • 472 YDS • S.I 16
Hole 11 is another visually great hole. A dead straight par 5 and a good chance to make birdie if you can drive it straight. Longer hitters can attempt to make the green in 2 but this will require a well struck shot to carry the large pond which stretches up the right side of the fairway to the front of the green. Usually a solid 3 shots to this green will result in a nice par. Take note of the flag position to avoid an awkward long putt.
-

HOLE #12
PAR 3 • 188 YDS • S.I 8
Hole 12 is one of those par 3s that can play anything from a short iron to a wood depending on the conditions. A dense wooded area runs parallel to the fairway down the right side and is like a magnet to golf balls. The perfect shot is to pitch on the right side of the green. Anything right here is dead and anything left will leave you a very very tricky up and down to save par. Slightly short is not a bad leave here but be careful of the bunker at short left. Par is a good result here.
-

HOLE #13
PAR 4 • 316 YDS • S.I 2
Hole 13 is short right angle dog leg par 4. The hole is short but can be challenging. An iron off the tee is a good play here as long as you get it past the corner. This should leave you a relatively short approach up the hill to a large green. Getting your second shot close is very difficult and the green is deceptively hard to read. Caution is required from tee shot to putt. Walking off with a 4 will make you smile. Don’t forget to take a minute on the green and take in that stunning view of the Vale.
-

HOLE #14
PAR 4 • 404 YDS • S.I 4
Hole 14 is a beautiful slight dogleg right. Longer hitters can take on the “tiger line” over the corner of the trees but beware going right of your intended line. As you turn the corner you have some lovely views over the vale and towards the B.A hangar in the distance where you should see some jumbo jets lined up. If you are on the fairway you will have a very inviting approach shot to the green. Club selection is vital here as its easy to go long and cost yourself a few shots.
-

HOLE #15
PAR 5 • 469 YDS • S.I 18
Hole 15 is one of the easier holes on the course. Usually the prevailing wind will assist you here and if you hit a good drive you can get close with your second shot. The second shot will almost certainly be a blind shot so picking your line is essential here. This is a great chance to get a shot back on the course and 3 good shots should see you with a good birdie chance. Anything more than a par five here will leave you feeling like you have missed an opportunity.
-

HOLE #16
PAR 3 • 169 YDS • S.I 14
Hole 16 is one of Brynhills’ signature holes. A stunning Par 3 from an elevated tee and hitting over a valley to a two tier green. Protected at the front by a deep bunker which can gather in anything hit short. Club selection is crucial here to avoid a tricky putt either down the slope or up it depending on where the pin position is. Get it on the right level and you have a great chance of a 2. Anywhere else and you will certainly be struggling to make par.
-

HOLE #17
PAR 4 • 375 YDS • S.I 6
Hole 17 is fairly tight off the tee. Avoid right at all costs as you will either be blocked out by the tree lined fairway or lost ball. From your drive the hole slightly doglegs right to a large elevated green. The second shot always seem to play longer than it looks and the bunker left does a great job of collecting a wayward approach. Find the green and you will have a tricky putt no matter how close you are. A 4 here is always a pleasing par.
-

HOLE #18
PAR 5 • 565 YDS • S.I 10
The 18th is a long Par 5 that doglegs to the left and finishes right in front of the clubhouse and the veranda area. Depending on the wind this hole can be a tough finish as the green is well protected by three bunkers. Trying to leave yourself a nice pitch in for your third shot is the objective here. Be careful not to go long with your approach as OOB is just beyond the back of the green. If the veranda is busy with those enjoying the 19th then your putt will feel like the world is watching you. Good luck.
SLOPE RATINGS
WHITE BOXES

YELLOW BOXES

RED BOXES

Official Course Record
The Brynhill official course record is 65 and was set by Andrew Dodd in August 2004
